I love gaming. I've played a lot of games for a long time but my kryptonite has always been hearing "X can't win/work", it's like a sweet siren call, and it makes me crazy.
So as my first real intro to X-wing finished up I wanted to try something different. I had only played rebels at that point. Yup I was really, really green, but so are Imperial lasers, so I figured it would work out.
I went into the store the following week and asked what nobody (at the time) flew and I received two answers, Tie Advanced and Tie Bombers.
Second question what do you have in stock? "One Advanced and a metric butt load of Bombers, but seriously you don't want to play those they aren't any good and ordinance is horrible, way over costed"
I'll take four.
And with that I set out to have some fun.
So lets look at the basics of the tie bomber.
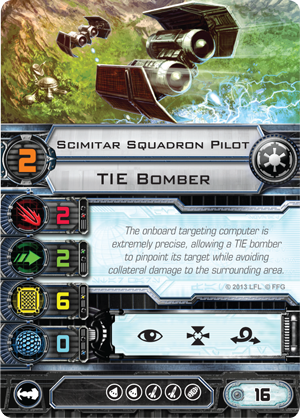
The basic stats for the bomber are nothing to write home about first glance. With 2 Attack it's on par with the Tie Fighter, but only has 2 Agility so it's gonna eat some shots not unlike an X-wing. But while it has no shields it has 6 hull, yup 6 hull. At double the hull of a Tie Fighter it makes out like a bandit for only three more points, oh and it's Pilot Skill 2 so it's not shooting dead last.
Now the action bar has focus, and barrel roll but lacks the evade action, though we find in it's place target lock, and well, I'm okay with that. I've always leaned towards target lock as I love mitigating really bad shooting phases when I can.
So add to that the fact that you can now add not one, or two, but 5 ordinance options, and then things get cool. Two torpedoes, to missiles and a bomb can be loaded up on this baby. Right now that maxes out at 27 extra points. And while I haven't seen anyone roll with that much, this thing is the mix and match delight of the X-wing game.
The Gamma bumps you up to PS 4 for two points and is a great option when the points allow for it. I find this one is great in a meta with a lot of basic ships.
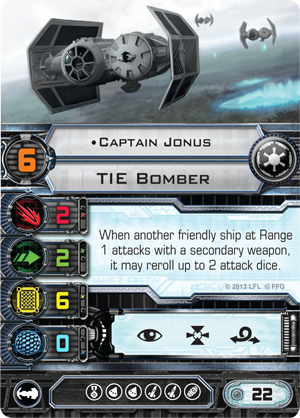

The two named pilots are both great and play different roles in squadron. But to note, both have the option for EPTs which are lacking on the other two Bomber options.
Captain Jonus comes in at PS six and is the Howlrunner of secondary weapons. He allows ships in range one to re-roll up to 2 attack dice. It's amazing with missiles and torpedoes but can also really beef up ships with cannons. Defenders and Firesprays love him. He's the support ship you've been looking for in Bomber form, just remember his value increases as you take secondary weapons, something a lot of people leave home.
Major Rhymer is a PS 7 bomber that can increase secondary weapon ranges by one to a limit of 1-3. So basically he can hit at all ranges with a Proton Torpedo, or have an Advanced Proton Torpedo hit at Range 2. That's usually a big surprise for people and can really change how a game plays out. Where he really shines though is with the new Proton Rockets, but we'll get back to that in a bit.
So where the game is won and lost, DIALS!
So the ship is slower than it's lighter fighter cousin, and the first glance should tell you this baby doesn't like turning. But the good news in my opinion is that it has a white 3 hard turn. A lot of people in my area would rather have the short tight turns, but for me a lumbering three is a huge boon as most people have a hard time visualizing it but it gets you where you want to go and can really be fun rolling into asteroid fields. Plus this ship wants to roll in, launch and get out to set up another run rather than being stuck in a tight dogfight.
The second piece of gold on the dial is the 5 K-Turn. I know a lot of people like short K-turns that could allow for a short range shot and allow for the fight continue, but again that's not this ships bag. The five lets you get the whole way out of dodge. Those horrible moments when you try for a K-Turn and bump, is usually not a thing that happens when you use the 5. This also usually buys you a turn to get another target lock if you still have ordinance.
The Greens are fairly good as well. 1-3 strait are all green as are two banks which I find is the most common way to bleed off stress.
The 2 hard turns are red, and this is something you really need to watch for. This ship doesn't want to be in the tight turn game, but sometimes you really want to do it. If you're not going into that turn with at least a target lock or a really good plan I often find it's a better idea to 5 K-turn past the target. Most people will turn into where they think you are, that puts them in the worst case scenario of having you on their tail one turn ahead of their K-turn or the like.
So then the big question is how to use the Bomber? In squads or as a support ship. I'm often a purist and like to go all out. But after I'm all done talking about the Bomber squadron I'll talk about them as support ships.
Running a Bomber squadron is all about clean flying. It's more reliant on actions than many squadrons because of the need for target locks to launch their payloads.
The upside is bombs are always a free thing to do as long as you get to reveal a dial. And that's kind of a big deal. It doesn't work if you're ioned, so, um, don't get ioned.
So it all starts with formation. There are a few different ways to start things off. You can take off in an extended line, a pinwheel or any other formation, though I've found it works better staying nice and tight but with the ability to turn. In most cases it ensures Jonas, your quarterback is in range one to hand out all his re-rolling goodness.
The pinwheel is my preferred way to fly it. I find it helps me get concentrated fire when I need it but it does have the drawback that sometimes there will be a ship in the back out of range. But that's why opening launches need to be done with care.
A lot of better players than me have written and demonstrated how to fly this formation so I'll point you in their direction.
Paul Heaver's article on the FF page
Team Covenants awesome article about Pinwheel formations
Above you see my formation when I'm on the left side of the board. I find it lets you turn in and have Jonus in a position where he can be in range and not be the closest ship which sometimes is a big deal, keeping him at range 2-3 is his favorite place to be. Be careful though, if your plan is to slow play before leaping out you have to put Jonus in the back. If you don't you'll bump and things will go really wrong.
The good news. Dials is easy when you try at almost all costs to keep them the same. Decide your move and then go. And when you can, go with everyone. When a ship other than Jonus is out of ordinance it may break off, but before that it needs to stay in formation and do it's job. Trust me on this one. But once the missiles and bombs are away feel free to go as furball as you can.
The initial turn in is probably the most important part of the game. People know this and I'm not saying anything really new here. But with bombers it's more than that. Remember you're bringing ships that need target locks to the fight. Against like ships you can come in slow or after them, just on the fringe before target locking, but against High PS ships you have to play hard and fast. When you don't have the PS advantage you have to fly in to range three to get your target lock, knowing that your opponent will still move. This isn't a problem if you brought multiple missiles that cover all range bands but if you didn't this is where your three bank, along with 5 K turn come into play.
I'm going to post up a heads on example of a superior PS run, but it can be applied with any pilot skill in mind. What the real take away is, is having a plan and adapting your speed thoughtfully, and applying the 5k turn effectively with your bomb drop. I know that this is perfect world stuff, but that's where theory starts and it's application though muddied by reality follows in fairly good form.
When you start to get close using target lock to gauge where you are is an amazing tool. In the example below on the previous turn the Bombers know they're starting just out of range.
If the Bombers try and slow play it an aggressive move, in this case a three forward gets the enemy ship into range one, where the alpha strike of the bombers is completely avoided unless they've brought range one missiles. Yes we get three dice here but a lot of other ships get four. It's not always a bad thing but it's something to consider.
In this example Jonus moved in aggressively as well taking a 3 forward, and the X-wing bumped, losing an action isn't able to shoot Jonus. I find these 3 and 4 forwards to be gold in getting close. The enemy will be trying to avoid range three as they know it's the realm of the bomber, so use it to your advantage and go for the bump. Of note often the 3 and 4 forward will get you the same result as far as blocking is concerned as your squadron takes up a bunch of room and an enemy ship will bump back to the start. Being aggressive often pays off.
Now if the whole squadron had moved as aggressively here's how it would end up. So at this range our enemy will get range one shots, but that's usually only going to result in hits 50% of the time on average without actions. Considering X-wings as the target that will not be enough on average to down a Bomber. That's good news for us. It will sometimes so keep that in mind, but you're also going to be dishing out some hurt here with even dice and actions.
This shows the beginning of the next turn before moves are made. With the bombs all being dropped at once to show the spread. Notice the X-wing is already in range of their effects.
Here we see both groups K-Turning in a standard joust. Yup that's an X-wing being hit by 4 bombs. If even a single shield came down the turn before he's a dead man.
Bellow you can see that even a hard turn won't get you out of there. Barrel roll and boost can help but they can't always save you, and if you've done the unthinkable and K turned or were stressed from things like push the limit, you're in for a bad day.
This formation makes amazing bomb runs. A lot of people think of bombs as part of shooting as you're causing damage but it like most everything else is all about how you fly and formation is key. When I started I always wanted to drop the perfect bomb, one at a time to get super maximum ultimate benefits. A few games in I realized I got a lot more out of the popcorn effect. Which you just saw above but lets look into it further.
So what's the popcorn effect you ask? Well the army realized that bombs do a lot more damage when they all land on a place at once, and that's pretty much true for X-wing as well as you saw above.
When you drop all the bombs you leave a big wake. A range three by three area is a "everything gets hurt" area. Yup a three by three. And in that there is a large area, almost range one and a half by one and a half that takes 4 hits. A bunch with three and a ton with two. The thing about using the pinwheel formation as we've shown is that the tighter it gets the larger an area you get with four hits. While the overall area is smaller you're going big with this drop and you want it to hurt bad. And tight formations make that happen.
In the Regional final game I dropped this pattern and killed a mint Howlrunner, and two ties. It was glorious, and yes we were both tired, he hadn't seen a whole lot of bomber formations before, but really, who has? And when you drop this flying off and doing a 5 K-turn sets you up to really hurt the survivors of the carnage.
If you think about how a lot of things fly they are going to end up here, especially when you have those range one engagements, this is where ships will end up next turn. When a predator like a phantom try's to chase you down, this is where he goes. It's a freaking big area. And this is why you really want to use the popcorn effect. Ships go in and fewer come out, and fewer ships is the goal.
But alas as of right now all the bomber can carry only a single bomb. I'm hoping that we might see something that gives them a second bomb, but I'm not holding my breath. So with only one bomb then the choice of bomb becomes really important. Right now we have three types in the game, seismic charges, proton bombs and proximity bombs.
Each have their place. I'm a fan of the seismic charge. They were in The Empire Strikes Back searching for the Millennium Falcon in the asteroid field, so yeah, and they're cheap, but the expensive proton bombs bypass shields and give unavoidable crits, which is pretty cool.
Special note to the proximity mine. They are a different cat. When a ship maneuvers over the template it takes three attack dice of damage with no modifier. This is kinda random, super cool and really useful when setting up 'no go' areas for your opponent if you're really trying to limit his movement or coral him somewhere. They are also low PS killers. A single ship can roll through multiple templates with ease and take lots of dice.
Missiles and torpedoes are the big deal on the bomber. Being able to carry up to four these ships can really change how they work or what they hunt with their load outs and can make for really flexible hunters.
Six choices all with their ups and downs. I'm a big fan of putting a homing missile on Jonus as he doesn't give himself a re-roll, but Jonus throwing out a big shot first can often make a big difference.
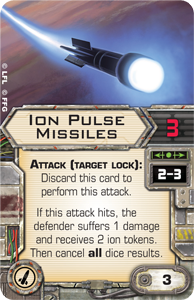
Assault missiles break up formations really well, concussions help out when your re-rolls don't help, clusters rip up Agility 1 ships. Then you have two special cases. The Ion which dolls out only one damage if it hits but can ION any ship, big or small. I find them useful in Epic games for really debilitating epic ships so that they can't do anything without their precious energy.
And then you have proton rockets. These could be great on a super flexible and agile ship, bringing it up to five dice but at range one for only 3 points. But range one is often a problem. They're great as a secondary round, but you don't want your only attack to be one that happens at range one. Rhymer excels with this round as he can bump it up to range two and then it becomes deadly. Add in a stealth device and he's rocking a range two five dice shot that keeps it's focus. With PTL it has target lock and focus, that results in a lot of dead ships. It won't last long though so this is when you fly in Rhymer and the boys at full speed to get that alpha strike.
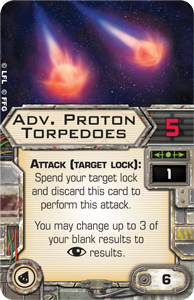
I'm actually a big fan of torpedoes. Protons are really similar to Concussion but help pick up for focus. Advanced while hard to use are pretty cool in that they hit crazy hard but again at range one so they are kinda Rhymer-liscious, but of late I'll take proton rockets and stealth.
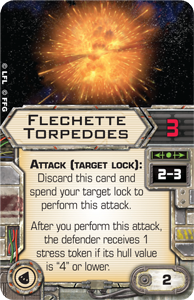
But nine times out of ten the Flechettes are the new money shot. Cheap and easy they dole out stress, which is the new black. Four eight points you can take four of these and either stress a ship out of the game or two ships for a few turns. It lets you stop ships from K-turning, taking actions, and in general being effective. It also pairs up well with proton rockets and bombs covering all of your ranges and providing you with the Swiss army knife of load outs. The big thing about these torpedoes is they don't even need to hit to stress a ship out, but it only works on ships with 4 hull or less, so no stressing out other Bombers, B-wings, and big ships.
So then Squads.
There are three basic squad types in my mind. Missile barges, Bomb runs, and Fighter Bombers and then hybrids, ie a mix of two types.
Missile Barge lists are usually four ship builds centered around Jonus. Everyone gets at least one missile, two is better and you proceed to plow through things. Bombs are a great add on to this list as you can cover your but as discussed earlier and most people forget about the bombs after volleys of missiles hit them from the front.
Here's a link to my "My name is Jonus" list
Bomb runs are just that, a small swarm of bombers with a bomb. Five Bombers with bombs Scimitars are great for this as you can run both a seismic and a flechette torpedo or you can upgrade either the type of bomb or the ship itself and take Gammas. Gammas have the added bonus of going before the hordes so you can often decide after other ships have moved if you want to drop the bombs, increasing their effectiveness.
Fighter bombers are an interesting way to go. It's the bombers take on the Tie Fighter swarm. Take Howlrunner, and add five Scimitars. you get one less ship but the rest double their hull. It's less maneuverable, but tanky. Played right it's down right mean.
Hybrids can be a ton of fun and they're where I started with bombers. They hit hard with the alpha strike of missiles and then continue the grind with Howlrunner.
My Hybrid list.
Bombers as add ons can be a great way to give your list some robust firepower. The main candidates for the job are the named characters but don't rule out the little guys, a couple of scimitars with homing missiles can rip the front end off of a Falcon or drop a Phantom, take Biggs out of the game or just generally mess up a plan.
Jonus is an amazing way to build up a secondary weapon list. If you're running HLCs or the like this is your man. He'll make your list regular, like prunes, deadly deadly prunes. Outside of that he has marginal use unless you really really want a PS 6 homing missile ship.
Rhymer is a very different story. He's often been ignored but with Proton rockets making the scene he's jumped in utility and is really cool right now. He sits around 40 points all dolled up which is a lot but he hits like a hammer, with PTL he gets both focus and a target lock giving him a high probability of hitting with everything and giving a solid shot at crits.You can one shot most ships with this and if he's given some support he is a wrecking train. Stealth device and two sets of Proton Rockets with Push the Limit and Rhymer flies in at speed 3 or four fast and hard and kills a ship in the pass before turning and doing it again.
Give him a couple of Black Squadron Pilots as escorts, Draw their fire and wingman keep him clear of stress and ensure crits aren't effecting him. A Lamda makes a great anvil to Rhymers hammer, and the Doom shuttle is the perfect finisher being able to plink away the last bits of ships.
So that's my take on the Tie Bomber. They are not the pretty ship, the fast race car of the Imperial Navy. But like the A-10 Warthog they are beasts that bring the pain. And when flown well really ruin peoples day.
I love em, ugly and tough, they are a ton of fun. I hope you enjoy flying them as much as I do.
So if you have questions or just don't believe me say so in the comments and I'll see what I can do to help.
Until next time.






Chris, brilliant encyclopedic article! Love it, thanks for taking the time. Love the title. Makes me want to fly them more!
ReplyDelete