Wednesday 26 November 2014

After Action Reviews: A thought on process and returns

Time and time again after playing or watching people play games I hear the same thing said across a table "that always happens", or "I can just never win" or "That is just too powerful".  I find it interesting as when I watch, I see people make the same decisions over and over again, hoping for different results. I'm going to talk about how I move past making remarks and push for change in my play.

The mighty After Action Review (AAR) is a process by which military (and other) minds analyze combat or other actions with the goal being an understanding of what can be improved, mitigated and learned from the events.

So why am I writing about this? I've talked at length with people about this process as it relates to other games, and most specifically Flames of War. But what does this have to do with X-Wing? Well I'm a believer that this is simply a process by which you can hope to reflect and improve upon any action and that definitely applies to how I fly in a game of X-wing.

So is this just yaking about the game after the game?

Yes and no.

So when I think of AARs I think of three basic types. This is not the complete extent of AARs out there, there are all sorts of them, but I think of the three here as the easiest to use and those that dole out the most bang for the buck.

The three for me are the Hot Wash, the Immediate and the Deliberate. So then let's break that down.


The Hot Wash

So what's a hot wash? It's where you do a stop drop on what you're doing and sort things out. Best utilized when you and your opponent are on great terms or during training. So if you're having a really friendly game or getting ready for an event you have an awesome opportunity to use a hot wash. In my first game of X-Wing on Vassal I had an opportunity to do this with my opponent. It was late in the game and he was debating what to do with an Interceptor. He made the move and it put him in an interesting situation to use both Push the Limit and Barrel roll to get a must have shot off to kill off Biggs Darklighter. Problem was he wasn't sure which to do, and when he ended up moving his resulting position was out of arc. Well this was a great chance to just stop and let him do every move he could. Both of us got a ton out of it. Positionally we leaned what ships could do and we rehearsed combinations of moves that resulted in something amazing.

In those 'game changing' moments you have amazing opportunities, to see where you should have moved, or to justify what you did. You get to play out things on the table to see what could have been. Then you can go back to the original final positions and move on.

The importance of the Hot Wash is to get all the learning in right away and not forget either the position or the core concerns of the situation.

Don't do them for everything or you'll have a 7 hour game, but use them here and there to really maximize what you learn from big moments.


Remember that Hot washes are moments in time, they are not the rule or something that 'ALWAYS HAPPENS', that's for later. But it's simply something to play out in the moment to maximize situational learning.


The Immediate


So the Immediate AAR is one that takes place right after the game ends. Most of us know this as shooting the shit after a game. Hopefully over beers or other responsibly enjoyed beverages. So what do you get out of the Immediate? Well you get a few things. The game in context is one of them and this helps you look at some really important things. In the army we look at the principles of war (they change depending on what country you live in so don't worry about them specifically) but if you were to generically classify them here you might think of Firepower, Resiliency, Flexibility, and Mobility.

During the Immediate you can talk out what happened break down all the situations in their sum and look at planning as a complete process. I find it really helpful to take notes during an Immediate AAR. A small notebook is perfect for this. Note the two squads and if you can a quick drawing of the initial layout, followed by the things you thought important during the game. This is important because it becomes the basis of Deliberate AARs.

Immediate AARs are great times to talk about ideas and to brainstorm immediate improvements or fallbacks to a list. This is also a place where perceived weaknesses or tactics can be mulled around and debated. This is a great place to play with ideas because both people have just seen the lists perform and have an immediate feel for them. This is the best place to play with these ideas.

I have a simple thing I do with mine, the three and three. I list three things that went well and that I will continue to do and promote in my play. I then list three things that went wrong, that I will look to mitigate, change all together or plan against. 


I try not to make list changes based of immediate AARs. I find they are too small a sample size to get a real reading out of. Plus I find when your list constantly changes you don't learn to fly it to it's potential and that just means you're making lots of new mistakes all the time. I do like to make remarks about my build in my notes, which will be a huge help later when I look to make changes.

The Immediate is like a day in your life. People have bad days, and good days. But you can't look at your one bad day and assume that's the way it always is. A lot of players do this. You know them, you've seen them, you may be them. The ones who say "THIS ALWAYS HAPPENS". Well the Immediate in combination with the Deliberate can help with this.


The Deliberate

So after a series of games sitting down and talking things out is super important to improving your play. Why you might ask? Isn't practice enough? In a word, no. One of the worst things a person can do is assume that their training is working and is good. On the range I've seen people shoot and shoot and shoot and shoot, etc, etc. And that practice is changing the way you shoot. But if you're practicing bad habits you're wrecking your shooting. The same is true in X-wing. You can practice bad habits, poor formations, tons of bumping or a lack of concentration of firepower. And the way you figure out if you're 'getting it' or not is by looking at your notes, reviewing whats gone right and wrong and analyzing the direction of your performance. This is where you can set goals, devise plans and or requirements for your future training and direct yourself in the direction you want to go.


I like to look at the patterns in my notes and as stated come up with training or tactical plans but also look to make needed changes to my lists.

The deliberate has an awesome secondary function in X-Wing and other table top gaming, it helps you not only discern the Meta but to project and plan against the meta. If you're taking notes of what you're playing against all the time, what you're seeing locally hitting the tables. This is huge. You may have an awesome list, but it could have huge flaws in a local or other meta and the deliberate helps you see what's going on and deal with it.


Deliberates are best when you come in with stuff ready, be it power point like two time World Champion Paul Heaver (Check out his awesome article on Team Covenant about prep and play during the worlds where he talks about his version of the Deliberate AAR) or wipe boards, a pile of notes or something else really helps as you can work with the info. Now if you've sorted the info ahead of time it'll speed things up. Again, a beer or two always helps with these when enjoyed like gaming, in a responsible manner.

Tournament or even game night results are a perfect thing to keep track of for this kind of event and I encourage you to do this in a group. We have a tendency to self justify what we want to, so having a second set of eyes helps you call shenanigans on what you're doing.


Watching videos or keeping up with major events is also really awesome for this kind of work as lists that do well in major events will commonly pop up in local events as people flock to do well with what they think is the 'new best thing'. Be it Fat Han or Phantoms, this will help you design a list to fight an win.

Looking at what you're doing and adjusting as you see fit helps you move forward. What I talked about here might help you, it might now but it's something to think about. I find it really helpful. Plus it's a great excuse to sit around and shoot the breeze about X-Wing and have a beverage or two.

So in conclusion, look to get practice and immediate tactical decision making lessons out of a Hot Wash.  Immediate reviews give you lessons learned from games, where the three good and bad points show you what you did right and wrong.  And the Deliberate gives you confirmation of your direction of play and that of the meta.

Here's to beer, x-wing and the pursuit of the perfect game. ( ie the one you have the most fun in)

Until next time.

Wednesday 19 November 2014

Darkhorse's Strange Love, Or how I stopped being afraid and learned to love the bomber.

During my first X-wing tournament (which humorously enough was the first time I played a full 100 pt game) I heard something from a lot of the local players. The only viable Imperial list was the Tie Fighter Swarm.


I love gaming. I've played a lot of games for a long time but my kryptonite has always been hearing "X can't win/work", it's like a sweet siren call, and it makes me crazy.

So as my first real intro to X-wing finished up I wanted to try something different. I had only played rebels at that point. Yup I was really, really green, but so are Imperial lasers, so I figured it would work out.

I went into the store the following week and asked what nobody (at the time) flew and I received two answers, Tie Advanced and Tie Bombers.

Second question what do you have in stock? "One Advanced and a metric butt load of Bombers, but seriously you don't want to play those they aren't any good and ordinance is horrible, way over costed"

I'll take four.

And with that I set out to have some fun.


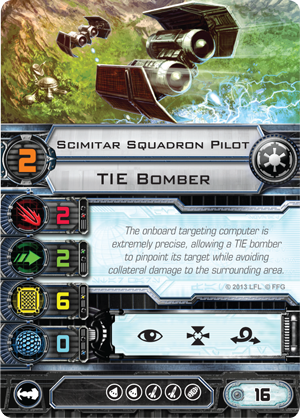
So lets look at the basics of the tie bomber.


The basic stats for the bomber are nothing to write home about first glance. With 2 Attack it's on par with the Tie Fighter, but only has 2 Agility so it's gonna eat some shots not unlike an X-wing. But while it has no shields it has 6 hull, yup 6 hull. At double the hull of a Tie Fighter it makes out like a bandit for only three more points, oh and it's Pilot Skill 2 so it's not shooting dead last.

Now the action bar has focus, and barrel roll but lacks the evade action, though we find in it's place target lock, and well, I'm okay with that. I've always leaned towards target lock as I love mitigating really bad shooting phases when I can.

So add to that the fact that you can now add not one, or two, but 5 ordinance options, and then things get cool. Two torpedoes, to missiles and a bomb can be loaded up on this baby. Right now that maxes out at 27 extra points. And while I haven't seen anyone roll with that much, this thing is the mix and match delight of the X-wing game.


The Gamma bumps you up to PS 4 for two points and is a great option when the points allow for it. I find this one is great in a meta with a lot of basic ships. 


The two named pilots are both great and play different roles in squadron. But to note, both have the option for EPTs which are lacking on the other two Bomber options.

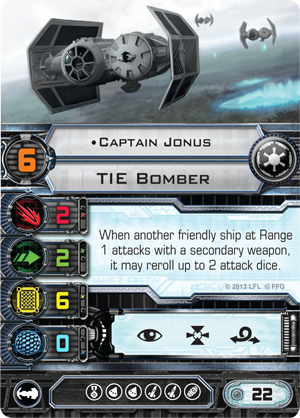
Captain Jonus comes in at PS six and is the Howlrunner of secondary weapons. He allows ships in range one to re-roll up to 2 attack dice. It's amazing with missiles and torpedoes but can also really beef up ships with cannons. Defenders and Firesprays love him.  He's the support ship you've been looking for in Bomber form, just remember his value increases as you take secondary weapons, something a lot of people leave home.

Major Rhymer is a PS 7 bomber that can increase secondary weapon ranges by one to a limit of 1-3. So basically he can hit at all ranges with a Proton Torpedo, or have an Advanced Proton Torpedo hit at Range 2. That's usually a big surprise for people and can really change how a game plays out. Where he really shines though is with the new Proton Rockets, but we'll get back to that in a bit.


So where the game is won and lost, DIALS!

So the ship is slower than it's lighter fighter cousin, and the first glance should tell you this baby doesn't like turning. But the good news in my opinion is that it has a white 3 hard turn. A lot of people in my area would rather have the short tight turns, but for me a lumbering three is a huge boon as most people have a hard time visualizing it but it gets you where you want to go and can really be fun rolling into asteroid fields. Plus this ship wants to roll in, launch and get out to set up another run rather than being stuck in a tight dogfight.

The second piece of gold on the dial is the 5 K-Turn. I know a lot of people like short K-turns that could allow for a short range shot and allow for the fight continue, but again that's not this ships bag. The five lets you get the whole way out of dodge. Those horrible moments when you try for a K-Turn and bump, is usually not a thing that happens when you use the 5. This also usually buys you a turn to get another target lock if you still have ordinance.

The Greens are fairly good as well. 1-3 strait are all green as are two banks which I find is the most common way to bleed off stress.

The 2 hard turns are red, and this is something you really need to watch for. This ship doesn't want to be in the tight turn game, but sometimes you really want to do it. If you're not going into that turn with at least a target lock or a really good plan I often find it's a better idea to 5 K-turn past the target. Most people will turn into where they think you are, that puts them in the worst case scenario of having you on their tail one turn ahead of their K-turn or the like.


So then the big question is how to use the Bomber? In squads or as a support ship. I'm often a purist and like to go all out. But after I'm all done talking about the Bomber squadron I'll talk about them as support ships.

Running a Bomber squadron is all about clean flying. It's more reliant on actions than many squadrons because of the need for target locks to launch their payloads.

The upside is bombs are always a free thing to do as long as you get to reveal a dial. And that's kind of a big deal. It doesn't work if you're ioned, so, um, don't get ioned.


So it all starts with formation. There are a few different ways to start things off. You can take off in an extended line, a pinwheel or any other formation, though I've found it works better staying nice and tight but with the ability to turn. In most cases it ensures Jonas, your quarterback is in range one to hand out all his re-rolling goodness.


The pinwheel is my preferred way to fly it. I find it helps me get concentrated fire when I need it but it does have the drawback that sometimes there will be a ship in the back out of range. But that's why opening launches need to be done with care.

A lot of better players than me have written and demonstrated how to fly this formation so I'll point you in their direction.

Paul Heaver's article on the FF page

Team Covenants awesome article about Pinwheel formations


Above you see my formation when I'm on the left side of the board. I find it lets you turn in and have Jonus in a position where he can be in range and not be the closest ship which sometimes is a big deal, keeping him at range 2-3 is his favorite place to be. Be careful though, if your plan is to slow play before leaping out you have to put Jonus in the back. If you don't you'll bump and things will go really wrong.

The good news. Dials is easy when you try at almost all costs to keep them the same. Decide your move and then go. And when you can, go with everyone. When a ship other than Jonus is out of ordinance it may break off, but before that it needs to stay in formation and do it's job. Trust me on this one. But once the missiles and bombs are away feel free to go as furball as you can.

The initial turn in is probably the most important part of the game. People know this and I'm not saying anything really new here. But with bombers it's more than that. Remember you're bringing ships that need target locks to the fight. Against like ships you can come in slow or after them, just on the fringe before target locking, but against High PS ships you have to play hard and fast. When you don't have the PS advantage you have to fly in to range three to get your target lock, knowing that your opponent will still move. This isn't a problem if you brought multiple missiles that cover all range bands but if you didn't this is where your three bank, along with 5 K turn come into play. 

I'm going to post up a heads on example of a superior PS run, but it can be applied with any pilot skill in mind. What the real take away is, is having a plan and adapting your speed thoughtfully, and applying the 5k turn effectively with your bomb drop. I know that this is perfect world stuff, but that's where theory starts and it's application though muddied by reality follows in fairly good form.

When you start to get close using target lock to gauge where you are is an amazing tool. In the example below on the previous turn the Bombers know they're starting just out of range. 

If the Bombers try and slow play it an aggressive move, in this case a three forward gets the enemy ship into range one, where the alpha strike of the bombers is completely avoided unless they've brought range one missiles. Yes we get three dice here but a lot of other ships get four. It's not always a bad thing but it's something to consider. 

In this example Jonus moved in aggressively as well taking a 3 forward, and the X-wing bumped, losing an action isn't able to shoot Jonus. I find these 3 and 4  forwards to be gold in getting close. The enemy will be trying to avoid range three as they know it's the realm of the bomber, so use it to your advantage and go for the bump. Of note often the 3 and 4 forward will get you the same result as far as blocking is concerned as your squadron takes up a bunch of room and an enemy ship will bump back to the start. Being aggressive often pays off.

Now if the whole squadron had moved as aggressively here's how it would end up. So at this range our enemy will get range one shots, but that's usually only going to result in hits 50% of the time on average without actions. Considering X-wings as the target that will not be enough on average to down a Bomber. That's good news for us. It will sometimes so keep that in mind, but you're also going to be dishing out some hurt here with even dice and actions.


This shows the beginning of the next turn before moves are made. With the bombs all being dropped at once to show the spread. Notice the X-wing is already in range of their effects. 


Here we see both groups K-Turning in a standard joust. Yup that's an X-wing being hit by 4 bombs. If even a single shield came down the turn before he's a dead man.


Bellow you can see that even a hard turn won't get you out of there. Barrel roll and boost can help but they can't always save you, and if you've done the unthinkable and K turned or were stressed from things like push the limit, you're in for a bad day.


This formation makes amazing bomb runs. A lot of people think of bombs as part of shooting as you're causing damage but it like most everything else is all about how you fly and formation is key. When I started I always wanted to drop the perfect bomb, one at a time to get super maximum ultimate benefits. A few games in I realized I got a lot more out of the popcorn effect. Which you just saw above but lets look into it further.

So what's the popcorn effect you ask? Well the army realized that bombs do a lot more damage when they all land on a place at once, and that's pretty much true for X-wing as well as you saw above.


When you drop all the bombs you leave a big wake. A range three by three area is a "everything gets hurt" area. Yup a three by three. And in that there is a large area, almost range one and a half by one and a half that takes 4 hits. A bunch with three and a ton with two. The thing about using the pinwheel formation as we've shown is that the tighter it gets the larger an area you get with four hits. While the overall area is smaller you're going big with this drop and you want it to hurt bad. And tight formations make that happen.

In the Regional final game I dropped this pattern and killed a mint Howlrunner, and two ties. It was glorious, and yes we were both tired, he hadn't seen a whole lot of bomber formations before, but really, who has? And when you drop this flying off and doing a 5 K-turn sets you up to really hurt the survivors of the carnage.

If you think about how a lot of things fly they are going to end up here, especially when you have those range one engagements, this is where ships will end up next turn. When a predator like a phantom try's to chase you down, this is where he goes. It's a freaking big area.  And this is why you really want to use the popcorn effect. Ships go in and fewer come out, and fewer ships is the goal.

But alas as of right now all the bomber can carry only a single bomb. I'm hoping that we might see something that gives them a second bomb, but I'm not holding my breath. So with only one bomb then the choice of bomb becomes really important. Right now we have three types in the game, seismic charges, proton bombs and proximity bombs.


Each have their place. I'm a fan of the seismic charge. They were in The Empire Strikes Back searching for the Millennium Falcon in the asteroid field, so yeah, and they're cheap, but the expensive proton bombs bypass shields and give unavoidable crits, which is pretty cool.

Special note to the proximity mine. They are a different cat. When a ship maneuvers over the template it takes three attack dice of damage with no modifier. This is kinda random, super cool and really useful when setting up 'no go' areas for your opponent if you're really trying to limit his movement or coral him somewhere. They are also low PS killers. A single ship can roll through multiple templates with ease and take lots of dice.

Missiles and torpedoes are the big deal on the bomber. Being able to carry up to four these ships can really change how they work or what they hunt with their load outs and can make for really flexible hunters.


Six choices all with their ups and downs. I'm a big fan of putting a homing missile on Jonus as he doesn't give himself a re-roll, but Jonus throwing out a big shot first can often make a big difference.

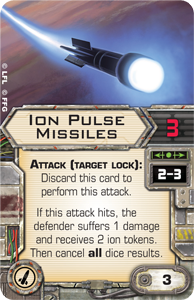
Assault missiles break up formations really well, concussions help out when your re-rolls don't help, clusters rip up Agility 1 ships. Then you have two special cases. The Ion which dolls out only one damage if it hits but can ION any ship, big or small. I find them useful in Epic games for really debilitating epic ships so that they can't do anything without their precious energy.

And then you have proton rockets. These could be great on a super flexible and agile ship, bringing it up to five dice but at range one for only 3 points. But range one is often a problem. They're great as a secondary round, but you don't want your only attack to be one that happens at range one. Rhymer excels with this round as he can bump it up to range two and then it becomes deadly. Add in a stealth device and he's rocking a range two five dice shot that keeps it's focus. With PTL it has target lock and focus, that results in a lot of dead ships. It won't last long though so this is when you fly in Rhymer and the boys at full speed to get that alpha strike.

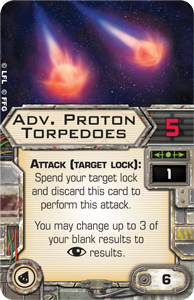
I'm actually a big fan of torpedoes. Protons are really similar to Concussion but help pick up for focus. Advanced while hard to use are pretty cool in that they hit crazy hard but again at range one so they are kinda Rhymer-liscious, but of late I'll take proton rockets and stealth.


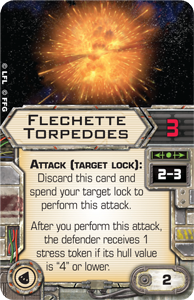
But nine times out of ten the Flechettes are the new money shot. Cheap and easy they dole out stress, which is the new black. Four eight points you can take four of these and either stress a ship out of the game or two ships for a few turns. It lets you stop ships from K-turning, taking actions, and in general being effective. It also pairs up well with proton rockets and bombs covering all of your ranges and providing you with the Swiss army knife of load outs. The big thing about these torpedoes is they don't even need to hit to stress a ship out, but it only works on ships with 4 hull or less, so no stressing out other Bombers, B-wings, and big ships.

So then Squads.

There are three basic squad types in my mind. Missile barges, Bomb runs, and Fighter Bombers and then hybrids, ie a mix of two types.

Missile Barge lists are usually four ship builds centered around Jonus. Everyone gets at least one missile, two is better and you proceed to plow through things. Bombs are a great add on to this list as you can cover your but as discussed earlier and most people forget about the bombs after volleys of missiles hit them from the front.


Here's a link to my "My name is Jonus" list

Bomb runs are just that, a small swarm of bombers with a bomb. Five Bombers with bombs Scimitars are great for this as you can run both a seismic and a flechette torpedo or you can upgrade either the type of bomb or the ship itself and take Gammas. Gammas have the added bonus of going before the hordes so you can often decide after other ships have moved if you want to drop the bombs, increasing their effectiveness.

Fighter bombers are an interesting way to go. It's the bombers take on the Tie Fighter swarm. Take Howlrunner, and add five Scimitars. you get one less ship but the rest double their hull. It's less maneuverable, but tanky. Played right it's down right mean.

Hybrids can be a ton of fun and they're where I started with bombers. They hit hard with the alpha strike of missiles and then continue the grind with Howlrunner.

My Hybrid list.

Bombers as add ons can be a great way to give your list some robust firepower. The main candidates for the job are the named characters but don't rule out the little guys, a couple of scimitars with homing missiles can rip the front end off of a Falcon or drop a Phantom, take Biggs out of the game or just generally mess up a plan.

Jonus is an amazing way to build up a secondary weapon list. If you're running HLCs or the like this is your man. He'll make your list regular, like prunes, deadly deadly prunes. Outside of that he has marginal use unless you really really want a PS 6 homing missile ship.

Rhymer is a very different story. He's often been ignored but with Proton rockets making the scene he's jumped in utility and is really cool right now. He sits around 40 points all dolled up which is a lot but he hits like a hammer, with PTL he gets both focus and a target lock giving him a high probability of hitting with everything and giving a solid shot at crits.You can one shot most ships with this and if he's given some support he is a wrecking train. Stealth device and two sets of Proton Rockets with Push the Limit and Rhymer flies in at speed 3 or four fast and hard and kills a ship in the pass before turning and doing it again.

Give him a couple of Black Squadron Pilots as escorts, Draw their fire and wingman keep him clear of stress and ensure crits aren't effecting him. A Lamda makes a great anvil to Rhymers hammer, and the Doom shuttle is the perfect finisher being able to plink away the last bits of ships.

So that's my take on the Tie Bomber. They are not the pretty ship, the fast race car of the Imperial Navy. But like the A-10 Warthog they are beasts that bring the pain. And when flown well really ruin peoples day.

I love em, ugly and tough, they are a ton of fun. I hope you enjoy flying them as much as I do.

So if you have questions or just don't believe me say so in the comments and I'll see what I can do to help.

Until next time.

Sunday 16 November 2014

Small X-wing Tourney fun

So I'm still not dead, not yet at least. But with work and life I really haven't gotten a whole lot done or even gamed of late.

I had a conversation with a good friend a while back and realized that I had been a bit bummed out for a while. I'm an avid gamer. I love solving problems and creating them for others. But after coming back home last year and feeling kinda separated from a lot of stuff and that included gaming, I was in a strange place, cause I'm an upbeat kinda guy. I'd gotten in little fits of gaming but haven't been doing anything regular. Like gaming islands in the ocean they were little awesome surprises but all too fleeting. But the support of good friends always gets you through things and this is no different.

So this weekend there was a small X-wing tournament at JimCon 4, and a few friends asked me if I'd come out for it. Waking up for 5am to make the two and a half hour drive wasn't something I was looking forward to but I'm really glad I did.


After talking with my friends in the week prior and them inviting me out, I got kinda excited. Even my wife noticed a difference. With the World Championships going on at FF in the states I was glued to twitch and reading everything that came out of Team Covenant. I wasn't looking for hints or insights but I was really kind of living vicariously and building a bit of excitement one game at a time.

I hadn't played much since the Regional Tournament, maybe a handful of games if that, and all with Y-wings. After running Tie Bombers at Regionals on a dare I had been flying the much maligned Y-wing to enjoy all of it's glory. I love the things. They're the Warthog (A-10) of the X-wing world. So ugly only a mother could love.


The Gold Squadron of Y wings I run

But I wanted to try something different. I was looking at all the wingeing (constructive conversations) about Fat Han and Phantoms and the crisis of the Meta, a bunch of crap in my opinion, I wanted to bring something a bit throw back, with a lot of punch and that wasn't using the new toys to do it. 

So pouring over the cards I thought to myself, what do I put together that can deal with all of this new stuff. I needed it to stand up to a 4 die attack or the rerolling madness of a turreted falcon. There it was, right in front of me. My old friend, the B-wing. I grabbed two Blue Squadron B's and went on my way. I pumped them up with Fire Control Systems. The life of a B can be stressed and or needing augmentation and getting an action for shooting is something I could live with. I then went out on a limb, and grabbed a Heavy Laser Cannon for each. Sighed deeply and hoped I had made the correct choice.


Was it too many points? Could this just be alpha'd by a high PS squad flying in hard and fast before I could even use it? A B-wing has 5 shields, 5 hits can be taken before crits could basically end the HLCs and the whole point of the B. I wanted to beef them both up and I decided to do that with Biggs. I'm not a huge Biggs fan, I may have flown him once before so being new to him brought some risks. But he did add essentially 5 Shields to my squad. I added nothing to him as the plan was for him to die, and not wanting him to take much with him I left him bare.


I had thirteen points left which I filled up with a Bandit pilot in a headhunter. He was going to fly with the group at first and then fly hard and fast to give the enemy a second target that wasn't Biggs trying to draw some fire and to be a blocker, and he was great at both.


I'm loving the versatility that the Headhunter has brought to the Rebels, it's still tanky by comparison to Imperial stuff but really cheap and great filler for a Rebel list.

My list.
I was hoping this stay alive long enough to deal out the damage I'd have to do.

So I showed up a few minutes early and was greeted by Michael Haire, who had invited me to come as he was running the tournament at JimCon and Mark Burke of internet fame and stardom (Silentubiqity for you vassal fans). He's one of the cool kids who's making vassal better for X-wing players, and he's a beast in the Team Covenant Open. Mark had been bugging me to come and I'm really glad he did, it got me out and seeing him there I knew there was going to be a really cool list, with some amazing flying ahead.

In Regionals he ran a really mean list with a bounty hunter, Soontir Fel and a Doomshuttle. But more on that later.

So small turnout but those that were there got matched up quickly with a new app, they have apps for everything, and I was facing off against Andy. He's a dude. With a beard. Beard dude.       

He's new to the game and was running a pretty cool list. He wanted a mix of firepower and numbers with speed and violence, something I'm all about!

He took Soontir and Kir up front in interceptors, and ran Howlrunner, Backstabber and an Obsidian pilot. Stupid Obsidian pilot. It took everything to kill him.


The game was basically a joust up the middle. I got lucky going up the middle and dropped Soontir with the first volley from the Heavy Laser Cannon. The following turn we traded more fire and Biggs bought the farm while Kir and Howlrunner went up in flames. A turn or two of repositioning and he took out my bandit and the last of his ships blew up, with the Obsidian just irking me the whole time. I tried and tried and tried but just couldn't make him go down until the final shots.

100 - 37 for me.

The second game was against Jer, he's a jerk and we're not friends. He's an awesome dude in reality, great guy fun to hang with.

He ran a SERIOUS shuttle with a tie escort.

So Capt Jendon hired everyone for this one. His shuttle had a HLC, Anti pursuit lasers, Title, sensor jammer and both a rebel captive and a weapons engineer. 48 pts of mean machine. If you shot at him you could be stressed and have your shots turn to focus, all the while he could hand out target locks to a bunch of ties which is really mean.

Mauler was there with Predator as was Backstabber and Dark curse.

Three named ties and a big space cow. This would be interesting.


We started in opposite corners, with me racing up the side to get into a good position to roll in over the asteroids on my side while he slow played in, with Mauler taking off with a target lock and speeding away. He was trying to set up a horseshoe ambush but Maulers K turn kept him in my arcs by a fraction of an inch. Again the first shot of the HLC ended Mauler, and the next turn Backstabber. We did a dance with the fight rolling around the board and eventually back into my deployment zone where I finally caught the space cow and Dark Curse.

And Biggs lived.


100 - 0 for me.

Jer is pretty excited to see Scum and Villainy come out and it's awesome to know a great guy who'll be playing them with gusto in the new year. JER WE'RE STILL NOT FRIENDS! lol.

So the final game was going to be Mark and myself we knew it, and asked if there was a break for lunch, we were politely told no, that the next games would start ten minutes after time was to be called for this round, or 1230. So on that note Mark and I drove off to get lunch.

We had a great time chatting it up on all things X-wing and life and then drove back to finish it all off.

I met Mark at the Regionals and since then we've kept in contact online, chatting it up on lists and games, and I've avidly followed his Vassal play learning a ton from him and I couldn't wait to play him again.
Mark setting up in one of his other matches.
In our first game he slaughtered me during regionals, and we met again during the semi finals where I squeaked out a one point win when time was called. This was to be the rubber match and the question on our minds was had it been a fluke?

During the weeks prior we had talked of lists we were thinking of and he had stated he hoped it wasn't all Fat Hans, and that he was going to run Corran Horn. I should have known. He ran both lol. It was a super cool list. Han done up in style with Falcon title, determination, Gunner, C3-PO.


Corran Horn was tough as well with R2-D2, Push the limit and a Fire Control System.


I set up in a pinwheel thinking he was going to set diagonally from me and make me fly through the asteroids to get him. I changed up my formation putting a headhunter upfront instead of both B-wings. The thought was that I'd roll in with a Barrel roll, to put three ships facing the right of the table, like Paul Heaver taught in his article. In reality he setup with Corran where I thought he'd be but Han pretty much straight ahead.

We moved in but Han ended up a millimeter out of range of the headhunter. So back to dials it went.

I figured Han was going to try and make a run diagonally across the table, making me chase him through the asteroids while Corran crossed  through and double tapped me killing me off one by two.

So how to stop this, at least for a moment? Bandit time. I swung him in with a 3 hard right. Trying to block the most available positional area as  the B's slow rolled in with 1 banks with Biggs in tow.

Big surprise was he went the other way and swung in to my left towards the board edge.

Shots were fire and well, amazingly the bandit dodged all of Corrans shots while Biggs lost his shields. In return I dropped the majority of falcons shields, 4 I believe.

Dials was the Scary point. The last thing in the world I wanted was for Han to sing away hard with a 3 hard getting in behind me and tunning me up. So I bumped my First B into him with a one bank the other B pilled up behind. I wasn't super worried about losing my actions as the FCS gave me target locks. Now Biggs was the big deal, I gave him a hard left putting him precariously close to going off the table with his next move, but losing him was inevitable. It's Biggs afterall.

He was stuck in place. Han couldn't move and that meant I could pound away on him. He killed Biggs, but I ended up taking down Han and then it was a bandit and two pretty clean looking Bs vs Corran.

Two passes later and it was done. Corran is super slippery but the two HLC could catch him at long range and really hurt him. I was just happy the bandit lived.

100-25 for me.

To speak to the sportsmanship and just general awesomeness of my opponent Mark, I made a stupid error, I went left instead of right. I laughed about it, oh well, but he was like no worries dude just do what you were gonna do. He's that good a dude. Oh you totally botched the only part of the game you're responsible for? No worries. Again, I can't say it enough if you ever have the pleasure to play him do it. You'll be a better person for it.

My dice were liking me, his were a bit cold. In the end I think we're just gonna have to keep playing a bunch of games against each other, and I don't think anyone is upset about that.

It was only due to blocking that this game ended in my favor and the two of us are perhaps now more excited than ever to play.

He's gonna teach me how to play vassal and I'm pumped to get in more flying hours.

All in all it was great fun and really snapped me out of my funk which I'm really grateful for. I'm renewed with vigor to play X-wing and I can't wait until my next game with fun new builds.

Who knows I might even fly A-wings.

Until next time.


Saturday 27 September 2014

And now for the freedom factory

So the other half of the trade I picked up.


Along with 15 M113A3s, 5 ACAVs and 16 Pattons(I doubt I'll use the Pattons) this makes up the force I grabbed.

In the pic are 24 Bradley's, 7 Abrams, 6 M113 mortar carriers, 4 improved tow, and 5 paladins.

It's enough for a small combat team, and more importantly for defensive ops against an advancing en.

I'm going to be picking up a square Canadian combat team of LAVs and Leo 2s to add to he fun.

This is going to be a good time.

Thursday 25 September 2014

I can't even pretend to not be excited about this.

A trade showed up in the mail today and I'm rediculously excited about it.


So two full Motorized Rifle Coys with BMP 2s, a Tank bn - of T-72s, three full Coys and the Bn HQ.
A SPA pl of three 122s 2S1s, a pl of three BM-21s for some rocket action and some recce BRDMs, with some ATGM cars for good luck. There are three hinds and some planes as well.

Yup. I'm stoked. 

I'll post up the yanks I got next.

I'm going to base everything up so that it doesn't turn into a parking lot like in some games and pick up some infantry, because it's a little rediculous to not have the footsloggers.

Until next time.

Saturday 14 June 2014

Prairie con photo dump

While attendance may have been down, this year was a ton of fun at prairie con and instead of running games I sat back and enjoyed getting to play. He fine gents from the Fawcett ave conscripts on the other hand were running some games and I happily joined in on their great show of two amazing games. The first was the battle of Chinese farm, a fun bit of Arab Israeli action, and the second, Jawapocalypse was a mad frenzy in the Mos Eisly spaceport.
A big thanks to Greg, Dallas and Dave from the Fawcett ave conscripts for putting this on and to Byron a good buddy for killing so many jawas, enjoy the pizza.

Here's some of the pics.


Welcome to the Chinese farm...


A long time ago...


Until next time.